

When it comes to painting projects for Concord, CA are homes, whether exterior or interior, surface preparation is a critical step that often determines the success and longevity of the final result. Skipping or rushing through this phase can lead to a range of problems, from poor adhesion to unsightly imperfections.
Let us explore why surface preparation is so important and how it affects the overall quality of your painting projects. Let’s take a look at the key steps involved in prepping surfaces for paint, common mistakes to avoid, and the benefits of thorough preparation. Whether you’re tackling a Lafayette, CA area home improvement project or a professional job, understanding the importance of surface prep will help you achieve a smoother, more durable finish.
Understanding Surface Preparation
Surface preparation is a crucial step in any painting project, serving as the foundation for achieving a smooth, long-lasting finish. This process involves cleaning, repairing, and priming surfaces to ensure that the paint adheres properly and remains durable over time.
Definition and Purpose of Surface Preparation
Surface preparation refers to the actions taken to ready a surface for painting. This can include cleaning away dirt, grease, and old paint, repairing any damage, and applying a primer. The primary purpose is to create a clean, even surface that enhances paint adhesion and durability, preventing issues such as peeling, blistering, and uneven coloring. You may also need to perform some light carpentry work as well.
Difference Between Exterior and Interior Surface Preparation
While the basic principles of surface preparation apply to both exterior and interior projects, there are some key differences:
Exterior Surface Preparation:
- Cleaning: Outdoor surfaces often require more extensive cleaning to remove dirt, mildew, and pollutants.
- Repairs: Exterior surfaces may need more repairs due to weather-related damage.
- Priming: A weather-resistant primer is typically used to protect against moisture and UV rays.
Interior Surface Preparation:
- Cleaning: Interior surfaces usually involve less intensive cleaning, focusing on dust and grease removal.
- Repairs: Interior repairs often deal with drywall issues, such as holes and cracks.
- Priming: Interior primers are selected based on the specific type of wall material and the desired finish.
Common Misconceptions About Surface Prep

There are several misconceptions about surface preparation that can lead to subpar painting results:
- It’s Not Necessary: Some believe that cleaning and priming aren’t always needed. However, skipping these steps can cause paint to fail prematurely.
- Any Cleaner Will Do: Using the wrong cleaning products can leave residues that interfere with paint adhesion. It’s important to use appropriate cleaners for the specific surface.
- Priming Is a Waste of Time: Primer is essential for sealing surfaces, covering imperfections, and providing a uniform base for paint. Skipping primer can result in uneven coverage and reduced durability.
Proper surface preparation is essential for achieving professional-quality painting results, both inside and out. By understanding its importance and addressing common misconceptions, you can ensure a smoother, longer-lasting finish for your Benicia, CA area projects.
Benefits of Proper Surface Preparation
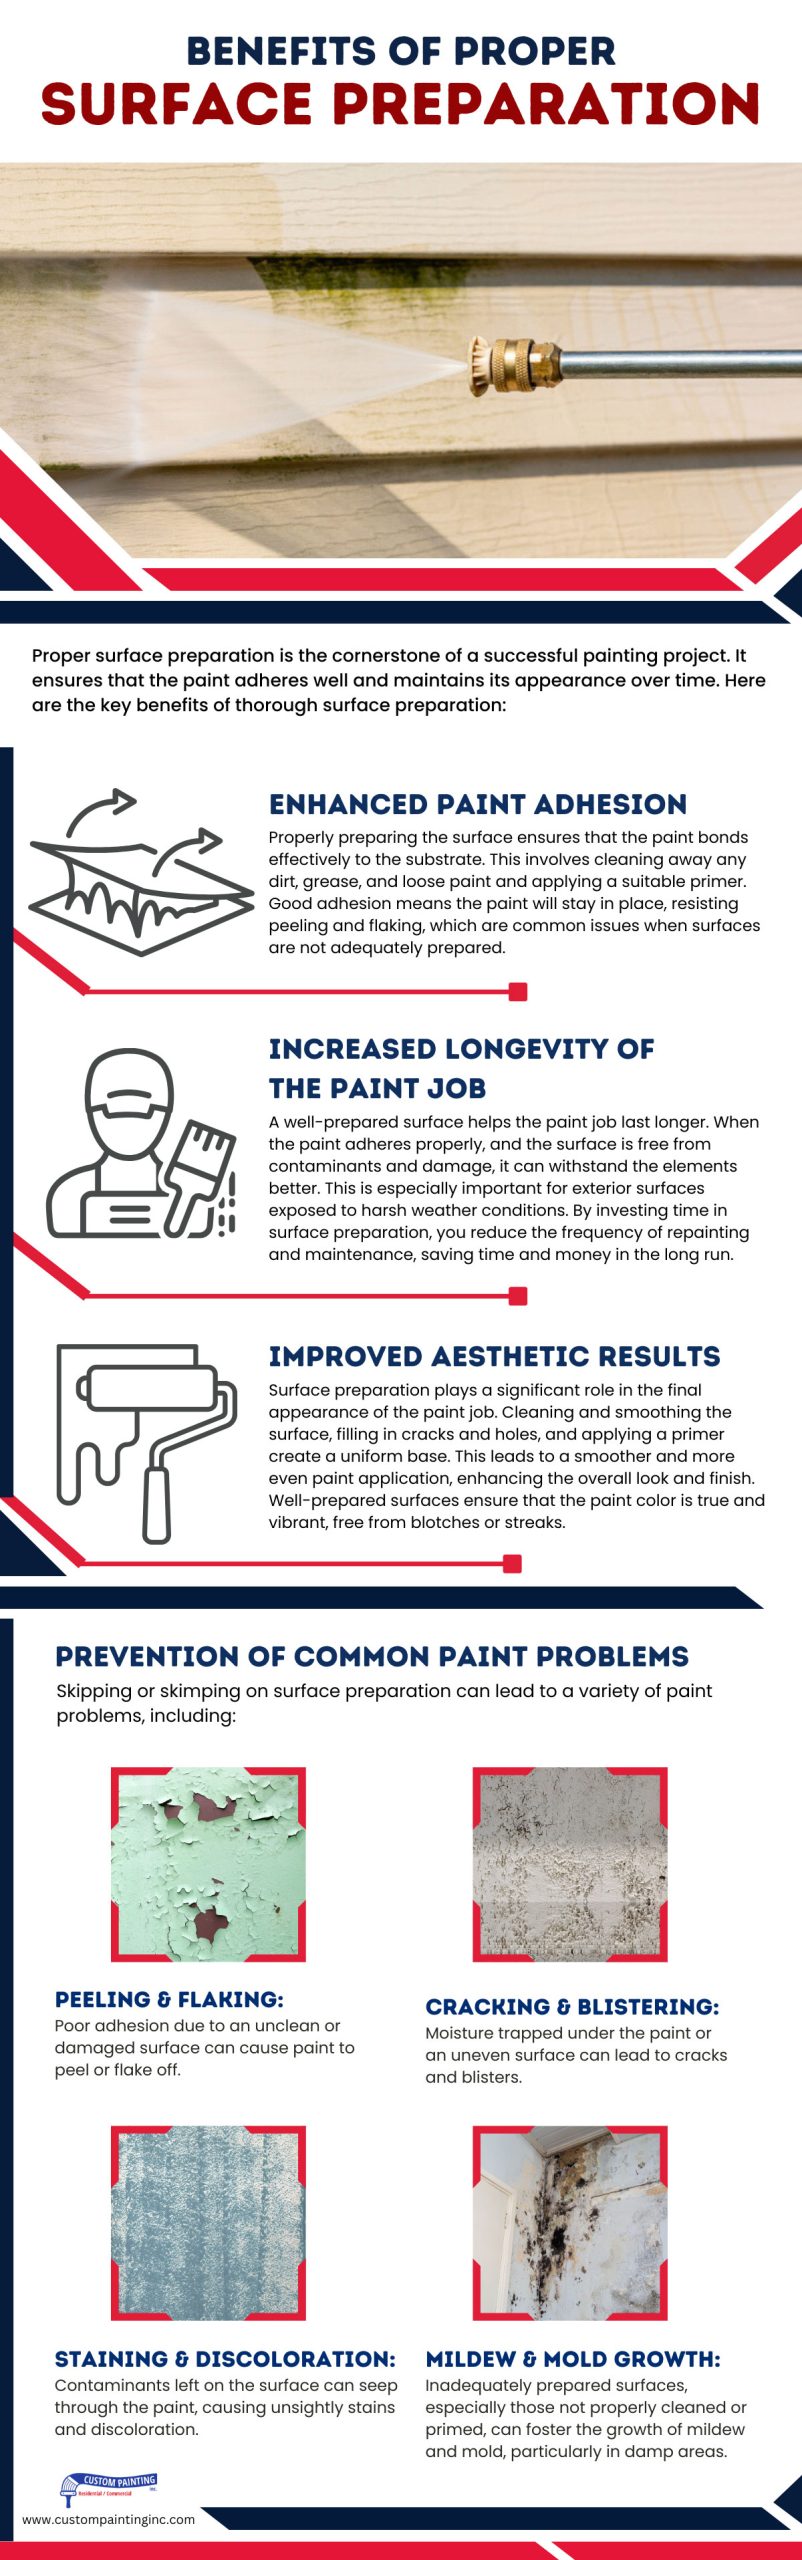
Proper surface preparation is the cornerstone of a successful painting project. It ensures that the paint adheres well and maintains its appearance over time. Here are the key benefits of thorough surface preparation:
Enhanced Paint Adhesion
Properly preparing the surface ensures that the paint bonds effectively to the substrate. This involves cleaning away any dirt, grease, and loose paint and applying a suitable primer. Good adhesion means the paint will stay in place, resisting peeling and flaking, which are common issues when surfaces are not adequately prepared.
Increased Longevity of the Paint Job
A well-prepared surface helps the paint job last longer. When the paint adheres properly, and the surface is free from contaminants and damage, it can withstand the elements better. This is especially important for exterior surfaces exposed to harsh weather conditions. By investing time in surface preparation, you reduce the frequency of repainting and maintenance, saving time and money in the long run.
Improved Aesthetic Results
Surface preparation plays a significant role in the final appearance of the paint job. Cleaning and smoothing the surface, filling in cracks and holes, and applying a primer create a uniform base. This leads to a smoother and more even paint application, enhancing the overall look and finish. Well-prepared surfaces ensure that the paint color is true and vibrant, free from blotches or streaks.
Prevention of Common Paint Problems
Skipping or skimping on surface preparation can lead to a variety of paint problems, including:
- Peeling and Flaking: Poor adhesion due to an unclean or damaged surface can cause paint to peel or flake off.
- Cracking and Blistering: Moisture trapped under the paint or an uneven surface can lead to cracks and blisters.
- Staining and Discoloration: Contaminants left on the surface can seep through the paint, causing unsightly stains and discoloration.
- Mildew and Mold Growth: Inadequately prepared surfaces, especially those not properly cleaned or primed, can foster the growth of mildew and mold, particularly in damp areas.
By thoroughly preparing the surface, you prevent these common issues, ensuring a durable, aesthetically pleasing, and long-lasting paint job. Proper surface preparation is an investment that pays off in the quality and longevity of the final result.
Steps in Surface Preparation for Exterior Painting
Proper surface preparation is essential for achieving a durable and attractive exterior paint job. Here are the key steps involved in preparing an exterior surface for painting:
Cleaning the Surface
The first step in exterior surface preparation is thorough cleaning. This removes dirt, mildew, algae, and other contaminants that can interfere with paint adhesion. The cleaning process typically involves:
- Pressure Washing: Using a pressure washer helps to remove loose dirt, paint, and grime from large areas quickly. This is especially useful for textured surfaces like brick or stucco.
- Scrubbing: For areas where pressure washing is not suitable, such as around delicate trim, manual scrubbing with a stiff brush and a cleaning solution is necessary.
- Rinsing: After scrubbing, it’s important to rinse the surface thoroughly to remove any remaining cleaning solution, which can affect the new paint’s adhesion.
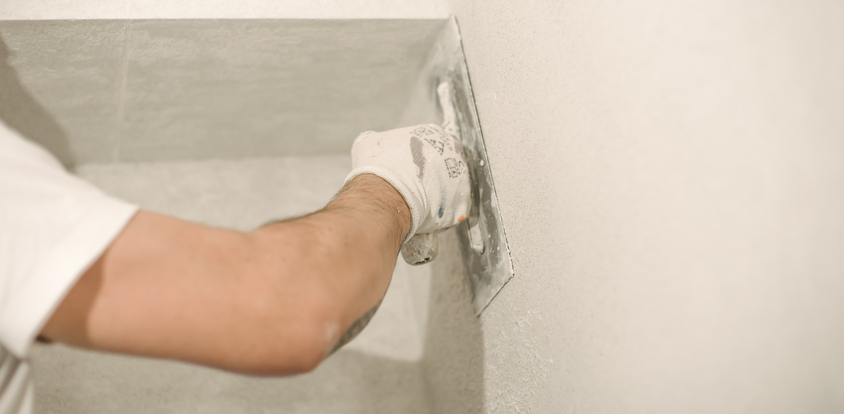
Repairing Surface Imperfections
Once the surface is clean, the next step is to address any imperfections. This involves:
- Inspecting for Damage: Look for cracks, holes, and other signs of damage. Pay special attention to areas around windows, doors, and gutters where damage is more likely to occur.
- Filling Cracks and Holes: Use exterior-grade filler or putty to fill in cracks and holes. For larger gaps, a caulking gun with a suitable sealant may be needed.
- Sanding: Smooth the filled areas and any rough spots by sanding. This ensures an even surface that will help the paint adhere better and look more uniform.
- Replacing Damaged Materials: In cases where wood or other materials are severely damaged or rotted, replacing these sections may be necessary before painting.
Priming the Surface
The final step in surface preparation is priming. Priming is crucial for several reasons:
- Sealing the Surface: Primer helps to seal porous surfaces, preventing the topcoat from soaking in unevenly and ensuring better coverage.
- Improving Adhesion: Primer creates a bonding layer that improves the adhesion of the paint, making it more durable and resistant to peeling.
- Blocking Stains: Certain primers are formulated to block stains from water damage, rust, or other sources, preventing them from bleeding through the topcoat.
Applying the Primer
- Choosing the Right Primer: Select a primer that is appropriate for the surface material and the conditions it will face. For example, use a mildew-resistant primer in damp climates.
- Application: Apply the primer evenly using a brush, roller, or sprayer, depending on the surface texture and area size. Ensure full coverage, particularly in areas that have been repaired or are more porous.
By following these steps, you can ensure that your exterior painting project starts with a solid foundation. Proper surface preparation enhances paint adhesion, improves the finish, and extends the lifespan of your paint job, resulting in a beautiful and long-lasting exterior.
Steps in Surface Preparation for Interior Painting
Proper surface preparation is crucial for achieving a high-quality, long-lasting interior paint job for any Vallejo, CA area home. Here are the essential steps involved in preparing an interior surface for painting:
Cleaning the Surface
The first step in interior surface preparation is thorough cleaning. This removes dust, grease, and other contaminants that can affect paint adhesion. The cleaning process typically involves:
- Dusting and Vacuuming: Start by dusting and vacuuming the walls and trim to remove loose dust and cobwebs.
- Washing: Use a mild detergent solution to wash the walls, especially in areas prone to grease and grime, such as kitchens and bathrooms. Rinse with clean water to remove any soap residue.
- Degreasing: For stubborn grease spots, use a degreaser or a mixture of water and vinegar to ensure the surface is completely clean.
Repairing Surface Imperfections
Once the surface is clean, the next step is to address any imperfections. This involves:
- Inspecting for Damage: Look for cracks, holes, nail pops, and other signs of damage. Pay special attention to high-traffic areas and corners where damage is more likely to occur.
- Filling Cracks and Holes: Use spackling compound or joint compound to fill in cracks, holes, and dents. Apply the compound with a putty knife, smoothing it out to be flush with the wall surface.
- Sanding: Once the filler is dry, sand the repaired areas and any rough spots to create a smooth, even surface. Use fine-grit sandpaper for a smooth finish, and wipe away dust with a damp cloth.
- Repairing Drywall: If there are larger areas of damage, such as significant cracks or holes, you may need to patch the drywall before proceeding.
Priming the Surface
The final step in surface preparation is priming. Priming is essential for several reasons:
- Sealing the Surface: Primer helps to seal porous surfaces, preventing the topcoat from soaking in unevenly and ensuring better coverage.
- Improving Adhesion: Primer creates a bonding layer that improves the adhesion of the paint, making it more durable and resistant to peeling.
- Blocking Stains: Certain primers are formulated to block stains from water damage, smoke, or other sources, preventing them from bleeding through the topcoat.
Applying the Primer
- Choosing the Right Primer: Select a primer that is appropriate for the surface material and the conditions it will face. For example, use a stain-blocking primer for areas with water or smoke damage.
- Application: Apply the primer evenly using a brush, roller, or sprayer, depending on the surface texture and area size. Ensure full coverage, particularly in areas that have been repaired or are more porous.
By following these steps, you can ensure that your interior painting project starts with a solid foundation. Proper surface preparation enhances paint adhesion, improves the finish, and extends the lifespan of your paint job, resulting in a beautiful and long-lasting interior.
Tools and Materials for Surface Preparation

Effective surface preparation requires the right tools and materials to ensure a smooth and durable paint job. Here are the essential items you’ll need for preparing both interior and exterior surfaces for painting:
Cleaning Tools and Materials
- Pressure Washer: Ideal for exterior surfaces, a pressure washer effectively removes dirt, grime, and loose paint from large areas.
- Scrub Brushes: Useful for scrubbing stubborn dirt and mildew, especially in corners and textured surfaces.
- Detergent and Cleaning Solutions: Mild detergent solutions for general cleaning and specialized cleaners or degreasers for removing tough grease and stains.
- Sponges and Rags: These are used to wipe down surfaces and remove residue after cleaning.
- Vacuum Cleaner: Essential for removing dust and cobwebs from interior surfaces.
Repair Tools and Materials
- Putty Knife: A versatile tool for applying a spackling compound or joint compound to fill cracks, holes, and dents.
- Spackling Compound/Joint Compound: Used to fill small cracks, holes, and imperfections in walls.
- Sandpaper and Sanding Blocks: Various grits of sandpaper (from coarse to fine) for smoothing repaired areas and rough spots.
- Caulking Gun and Sealant: For filling larger gaps and cracks, particularly around windows, doors, and trim.
- Drywall Patches: For repairing larger holes or damaged areas in drywall.
Priming Tools and Materials
- Primer: Choose the appropriate primer for the surface material and specific needs, such as stain-blocking primer for areas with previous damage.
- Paint Brushes: Various sizes are used to apply primer to edges, corners, and smaller areas.
- Paint Rollers: Ideal for larger surfaces, ensuring even application of primer.
- Paint Sprayer: Optional but useful for achieving a smooth, even coat over large areas quickly.
- Drop Cloths and Plastic Sheeting: To protect floors, furniture, and other surfaces from primer and paint splatters.
Safety Equipment
- Gloves: Protect your hands from chemicals and rough surfaces.
- Safety Glasses: Shield your eyes from dust, debris, and splashes from cleaning solutions or primers.
- Dust Masks/Respirators: Essential for protecting your lungs from dust and fumes, especially when sanding or using strong cleaning agents.
Miscellaneous Tools
- Tape Measure and Ruler: This is for measuring and marking areas that need repairs or priming.
- Painter’s Tape: For masking off areas that shouldn’t be painted, ensuring clean edges.
- Ladder: Necessary for reaching high areas, especially in exterior projects.
- Buckets and Trays: For mixing and holding cleaning solutions, primers, and paints.
By having these tools and materials on hand, you can ensure a thorough and effective surface preparation process. This foundation is key to achieving a professional-quality paint job that looks great and lasts for years.
Common Challenges and Solutions in Surface Preparation
Surface preparation is a crucial step in any painting project, but it can present several challenges. Addressing these challenges effectively ensures a smooth and durable paint job. Here are some common issues you might encounter during surface preparation and practical solutions to overcome them:
1. Stubborn Dirt and Grease
Challenge: Stubborn dirt, grease, and stains can be difficult to remove, particularly in kitchens, bathrooms, and exterior surfaces exposed to pollution and weather.
Solution:
- Use a degreaser or a mixture of water and vinegar to tackle grease.
- For exterior surfaces, employ a pressure washer to remove tough grime.
- Scrub with a stiff brush and a mild detergent solution for persistent dirt, ensuring you rinse thoroughly afterward.
2. Mold and Mildew
Challenge: Mold and mildew are common on both exterior and interior surfaces, especially in damp or poorly ventilated areas.
Solution:
- Apply a mixture of bleach and water (typically 1 part bleach to 3 parts water) to affected areas, letting it sit for a few minutes before scrubbing.
- Rinse thoroughly and allow the surface to dry completely.
- Use a mildew-resistant primer to prevent future growth.
3. Cracks and Holes
Challenge: Cracks, holes, and other imperfections can compromise the smoothness of the paint job and lead to premature paint failure.
Solution:
- Fill small cracks and holes with a spackling compound or joint compound using a putty knife.
- For larger gaps, use a caulking gun and an appropriate sealant.
- Sand the repaired areas smoothly once the filler is dry, and ensure the surface is even and ready for priming.
4. Flaking and Peeling Paint
Challenge: Old, flaking, or peeling paint must be removed to ensure the new paint adheres properly.
Solution:
- Scrape off loose paint with a paint scraper or a putty knife.
- Use a wire brush or sandpaper to smooth the edges of the remaining paint.
- Consider using a paint stripper for large areas with extensive peeling.
5. Uneven Surfaces
Challenge: Uneven surfaces, whether from old paint layers or underlying material issues, can lead to an unsightly finish.
Solution:
- Sand the surface thoroughly to level it out. For large areas, consider using an electric sander.
- Apply a skim coat of joint compound to particularly uneven sections, then sand smooth once it’s dry.
- Prime the surface to ensure an even base for the topcoat.
6. Adhesion Problems
Challenge: Paint may not adhere well to certain surfaces, such as glossy finishes or surfaces contaminated with oil or wax.
Solution:
- Sand glossy surfaces lightly to create a rough texture that paint can grip.
- Clean the surface with a deglosser or a mixture of water and TSP (trisodium phosphate) to remove oils and waxes.
- Always apply a primer designed for the specific surface material to improve adhesion.
7. Time Constraints
Challenge: Surface preparation can be time-consuming, leading to rushed jobs and missed steps.
Solution:
- Plan your project timeline carefully, allocating sufficient time for each step of the preparation process.
- Use quick-drying fillers and primers when time is limited, but ensure they are appropriate for the surface and conditions.
- Remember that thorough preparation saves time in the long run by preventing issues that require more extensive repairs.
8. Inadequate Ventilation
Challenge: Poor ventilation can cause problems with drying and increase exposure to fumes from cleaners and primers.
Solution:
- Ensure proper ventilation by opening windows and using fans to circulate air.
- For exterior projects, choose a day with favorable weather conditions, avoiding high humidity and rain.
- Wear appropriate safety gear, such as respirators, when working in poorly ventilated areas.
By recognizing and addressing these common challenges, you can ensure a well-prepared surface that leads to a high-quality, long-lasting paint job. Proper preparation is key to overcoming these obstacles and achieving professional results.
Professional Tips and Best Practices
Achieving a high-quality, durable paint job requires not only the right tools and materials but also a few professional tips and best practices. Here are some expert recommendations to ensure your surface preparation is thorough and effective:
- Assess the Surface Thoroughly: Before starting any preparation work, conduct a detailed assessment of the surface. Look for any signs of damage, contamination, or existing paint issues. This will help you determine the scope of work required and the best approach for preparation.
- Invest in Quality Materials: Using high-quality materials, from cleaners and fillers to primers and paint, can significantly impact the final result. While it may be tempting to save money on cheaper products, investing in quality materials ensures better performance and longevity.
- Follow Manufacturer Instructions: Always read and follow the manufacturer’s instructions for all products you use. This includes cleaning agents, fillers, primers, and paint. Proper application techniques and recommended drying times are crucial for optimal results.
- Use the Right Tools: Ensure you have the appropriate tools for each task. High-quality brushes, rollers, sandpaper, and other tools can make a big difference in the ease and effectiveness of your work. For large or intricate surfaces, consider using specialized equipment like electric sanders or paint sprayers.
- Clean Thoroughly: Cleaning is a fundamental step in surface preparation. Even if the surface appears clean, it’s essential to remove all dust, grease, and contaminants. Use appropriate cleaning solutions and ensure all residues are rinsed off. For interior surfaces, pay special attention to areas around cooking spaces and high-touch zones.
- Repair and Sand Carefully: Take your time with repairs. Fill cracks and holes meticulously and sand them smooth once dry. For larger repairs, use appropriate materials and techniques to ensure a seamless finish. Sanding should be done thoroughly to create a smooth, even surface that enhances paint adhesion.
- Prime Properly: Priming is crucial for sealing the surface and improving paint adhesion. Apply primer evenly, and allow it to dry completely before applying the topcoat. Use a primer suitable for the specific surface and any issues (e.g., stain-blocking primer for water-damaged areas).
- Control the Environment: For both interior and exterior projects, controlling the environment can impact the quality of your work. For interior projects, ensure good ventilation to aid drying and reduce exposure to fumes. For exterior projects, choose days with mild, dry weather to avoid issues with moisture and temperature fluctuations.
- Protect Surrounding Areas: Use drop cloths, plastic sheeting, and painter’s tape to protect floors, furniture, and fixtures from dust, debris, and paint splatters. Proper masking and covering save time on cleanup and prevent accidental damage.
- Maintain a Clean Workspace: Keep your workspace clean and organized. Regularly remove dust and debris that can interfere with your work. A tidy workspace not only makes the job easier but also reduces the risk of contaminating freshly prepared surfaces.
- Be Patient and Methodical: Surface preparation can be time-consuming, but rushing through it can lead to poor results. Take your time to ensure each step is completed thoroughly and correctly. A methodical approach to preparation sets the stage for a professional-quality paint job.
- Stay Safe: Always prioritize safety. Wear appropriate protective gear, such as gloves, safety glasses, and dust masks or respirators. Follow safety guidelines for handling chemicals and equipment to avoid accidents and health risks.
By incorporating these professional tips and best practices into your surface preparation routine, you can achieve a smoother, more durable, and aesthetically pleasing paint job. Proper preparation is the foundation of successful painting, and attention to detail at this stage will pay off in the final results.
Conclusion
Proper surface preparation is essential for achieving a high-quality, long-lasting paint job. By thoroughly cleaning, repairing, and priming your surfaces, you ensure better paint adhesion, increased durability, and a more attractive finish. For professional assistance with your painting project, contact Custom Painting, Inc. at 925-686-0903 or fill out the contact form on our website. We’re here to help you achieve the best results for your home or business.
