

Home painting projects in the Concord area can have a transformative impact on a space’s aesthetic appeal and atmosphere. The selection and application of a new coat of paint can rejuvenate an outdated room, enhance mood through color psychology, and increase a property’s market value. Such projects can be rewarding, provided they are well-planned and executed effectively.
Planning is a critical step in ensuring the success of a painting project. It involves choosing the right type of paint, considering factors like durability and finish, selecting colors that match the desired emotional impact and ambiance, and estimating the amount of paint and tools needed. Proper planning also includes preparing the space for painting, such as moving furniture, covering floors, cleaning walls, and taping off areas to avoid mistakes. You also have to consider projects such as door refinishing and varnishing, wall paper removal and wood rot repair. This preparatory work is essential to prevent disruptions and ensure a smooth workflow.
The painting project execution requires attention to detail and adherence to techniques that ensure a professional finish. It might include applying primer, using the right brushes or rollers, and applying multiple coats if necessary. During execution, maintaining a clean and organized work area helps prevent accidents and mistakes. The quality of execution can dramatically affect the paint’s longevity and the room’s overall look.
Setting clear goals
Is it essential to define the scope and objectives of your painting project?
Defining the scope and objectives of a painting project is crucial for several reasons, and it’s essential to consider both aesthetic goals and maintenance needs to ensure a successful outcome. Here’s why:
Scope and objectives
- Clarity of vision – Clearly defining what you want to achieve with your painting project helps to focus efforts and resources. For example, deciding whether the project is for a residential home, a commercial building, or an artistic installation affects the choice of materials, colors, and techniques.
- Budgeting and planning – Knowing the scope helps estimate costs, schedule the project timeline, and plan for any disruptions during the painting process. It ensures that the project remains feasible within financial constraints and available time.
- Targeted outcomes – Specific objectives guide the selection of paint types, colors, and styles. For example, a goal to brighten a space might lead to choosing lighter colors, while a desire for drama might steer choices toward bold contrasts.
Aesthetic goals vs. maintenance needs
- Aesthetic goals – These relate to the visual impact of the painting project. Aesthetics can include considerations of color psychology, thematic elements, historical accuracy (in restorations), or contemporary trends. The desired ambiance, whether calming, energizing, or professional, is dictated by these aesthetic choices.
- Maintenance needs – Practical considerations often include the durability of the paint, ease of cleaning, resistance to weather conditions (for exteriors), or the need for low-VOC (volatile organic compounds) materials in sensitive environments like schools or hospitals. Maintenance needs might lead to choosing gloss over matte finishes, as glossy surfaces are easier to clean but might not always align with aesthetic desires.
Budgeting smartly
Creating a comprehensive budget that effectively covers all aspects of a project, including materials, labor, and unexpected expenses, requires careful planning and foresight. Here are some tips and strategies for crafting such a budget and balancing cost with quality:
1. Detail all project components
- Materials – List all required materials. Research costs by comparing different suppliers. Consider quality and longevity versus immediate expenses.
- Labor – Factor in direct labor costs, including wages, benefits, and any subcontractor fees. Ensure you understand fair labor costs in your region to avoid under or overestimating.
- Unexpected expenses – Set aside a contingency budget, typically 10-20% of the total budget, to handle unforeseen costs.
2. Prioritize expenses
- Must-Have vs. nice-to-have – Prioritize spending on materials and labor essential to the project’s core functionality. Non-essential elements can be scaled back if necessary.
- Phased spending – Consider implementing the project in phases, allowing you to spread costs over time and adjust as necessary, based on cash flow.
3. Get multiple quotes
- Solicit multiple bids for materials and labor to ensure you get the best price without compromising quality. Be clear about your specifications to get accurate and comparable quotes.
4. Negotiate with suppliers and contractors
- Leverage your quotes and relationships to negotiate better terms with suppliers and contractors. It could include discounts, better payment terms, or bundling products for a lower price.
5. Monitor and review regularly
- Tracking – Implement a system to track actual spending against your budget. It helps identify any discrepancies or overruns early.
- Review and adjust – Regularly review the budget and adjust for any changes in project scope, unexpected expenses, or savings found along the way.
6. Invest in quality where it counts
- Long-term savings – Consider spending more on high-quality materials or skilled labor, which will save money in the long run, such as in reduced maintenance, durability, and efficiency.
- Warranties and Guarantees – Opt for products with warranties and hire contractors with good track records and guarantees, adding an extra layer of protection for your investment.
7. Use technology and tools
- Utilize budgeting software or construction management tools that help create detailed budgets, track expenses, and manage timelines effectively.
8. Legal and administrative considerations
- Ensure all contractual agreements with suppliers and laborers are clear and comprehensive. Include terms about payment schedules, deliverables, penalties for delays, and procedures for handling additional costs.
9. Environmental and sustainability considerations
- When possible, integrate sustainable materials and practices that might offer long-term financial benefits through energy savings, tax incentives, or more durable materials.

Choosing the correct paints and materials
When it comes to painting, choosing the right type of paint, finish, and tools is crucial for achieving the best results. Here’s a comprehensive guide to help you make the best choices for your painting projects.
Types of paint
1. Water-based paints (latex)
- Pros – Quick drying, easy cleanup with water, less odor.
- Cons – Less durable on high-touch surfaces.
- Best for – Walls, ceilings, and other large surfaces in homes.
2. Oil-based paints (Alkyd)
- Pros – Durable finish, smoother coat.
- Cons – Longer drying times, need for turpentine or paint thinner for cleanup, and stronger odor.
- Best for – Trims, doors, cabinets, furniture, and areas subjected to more wear.
3. Acrylic paints
- Pros – Durable, versatile, and resistant to fading.
- Cons – It can be more expensive.
- Best for – Exterior walls, metal surfaces, and artistic uses.
4. Enamel paint
- Pros – Hard, glossy finish, highly durable.
- Cons – It can crack or yellow over time and it takes a longer time to dry.
- Best for – Appliances, outdoor furniture, and floors.
5. Chalk paint
- Pros – Requires minimal surface preparation and dries quickly.
- Cons – Less durable without a protective finish.
- Best for – Furniture makeovers and shabby chic decor.
Paint finishes
1. Flat or matte
- Look – It is non-reflective and hides imperfections.
- Use – Ceilings, low-traffic areas.
2. Eggshell
- Look – Slight sheen, more durable than flat.
- Use – Living rooms, dining rooms.
3. Satin
- Look – Velvety sheen, easy to clean.
- Use – Kitchens, bathrooms, hallways.
4. Semi-gloss
- Look – Shiny finish, highly durable.
- Use – Trim, cabinets, bathrooms.
5. High gloss
- Look – Glass-like finish, very durable.
- Use – Accent areas, furniture.
Selecting tools and materials
1. Brushes
- Natural bristle brushes – Best for oil-based paints.
- Synthetic brushes (nylon, polyester) – Ideal for water-based paints.
- Shapes – Choose angled brushes for trim and flat brushes for broad surfaces.
2. Rollers
- Foam rollers – have a smooth finish, and are best for glossy paints on flat surfaces.
- Nap Rollers – Different nap lengths for different surface textures (the rougher the surface, the longer the nap).
3. Sprayers
- Pros – Fast application, professional finish.
- Cons – It requires more prep and cleanup, and overspraying can be an issue.
- Best for – Large or complex projects, exterior surfaces.
Tips for choosing materials based on surface and scale
- Small projects – Brushes and small rollers are sufficient.
- Large Areas (walls, ceilings) – Rollers and sprayers will save time and effort.
- Detailed or complex surfaces (furniture, cabinets) – Use a combination of brushes for detail work and rollers/sprayers for larger flat sections.
Additional tips
- Preparation – Always prepare surfaces by cleaning them and applying primer if necessary. It ensures the best adherence and longevity of your paint job.
- Testing – Before committing to a color or finish, test the paint on a small area or a sample board to see how it looks under different lighting conditions.
Timing and planning your project
Best Times of Year for Painting
1. Outdoor painting
- Best season – Late spring to early fall is generally the best time to undertake outdoor painting projects. Aim for temperatures ranging between 50°F and 85°F. It’s important to avoid extreme heat, as high temperatures can cause the paint to dry too quickly, leading to imperfections.
- Weather conditions – Ideal conditions are dry with low humidity. Paint adheres best when it isn’t too humid or raining, as moisture can affect the drying process and the result.
2. Indoor Painting
- Best season – You can do indoor painting year-round, but winter or early spring, when there is less humidity, can be ideal. During colder months in Benicia, ensure your space is well-ventilated, as windows might need to remain open slightly to ensure proper drying and to release paint fumes.
- Heating and ventilation – Heaters can help maintain a steady temperature and reduce humidity, aiding the drying process. However, ensure that the room isn’t too hot, which can cause similar issues to those experienced in high outdoor temperatures.
Planning a project timeline
1. Preparation
- Duration: Typically takes 1-3 days, depending on the size and condition of the area being painted.
- Activities include:
-
-
- Cleaning walls or surfaces to remove dust and grime.
- Repairing any holes or cracks with spackle.
- Sanding rough areas to ensure a smooth base.
- Taping off edges and covering furniture and floors to protect from drips.
-
- Priming the walls if necessary, especially if you’re making a significant color change or painting over a dark color.
2. Painting:
-
- Duration: The actual painting often requires 1-2 days per coat. Factors affecting duration include the size of the area, the type of paint, and the method of application (brush, roller, or sprayer).
- Considerations:
-
- Apply at least two coats for even coverage and durability.
- Allow for proper drying time between coats, which can vary based on paint type and environmental conditions.
- Check the manufacturer’s recommendations.
3. Drying time:
- Initial dry time: Most latex paints take about an hour to touch dry, but you should wait at least four hours before applying a second coat.
- Cure time: Paints can take up to 30 days to fully cure for Antioch area homes, during which they achieve their final hardness and durability. You can use the rooms during this period, but be gentle with the surfaces.
4. Final touches and cleanup:
-
- Duration: Usually takes about a day.
- Activities include:
-
-
- Removing painter’s tape once the final coat is nearly dry to avoid peeling off the paint.
- Touching up any missed spots or edges.
- Cleaning brushes, rollers, and other tools.
-
- Reassembling the room once the paint is dry to the touch.
Hiring professionals vs. DIY
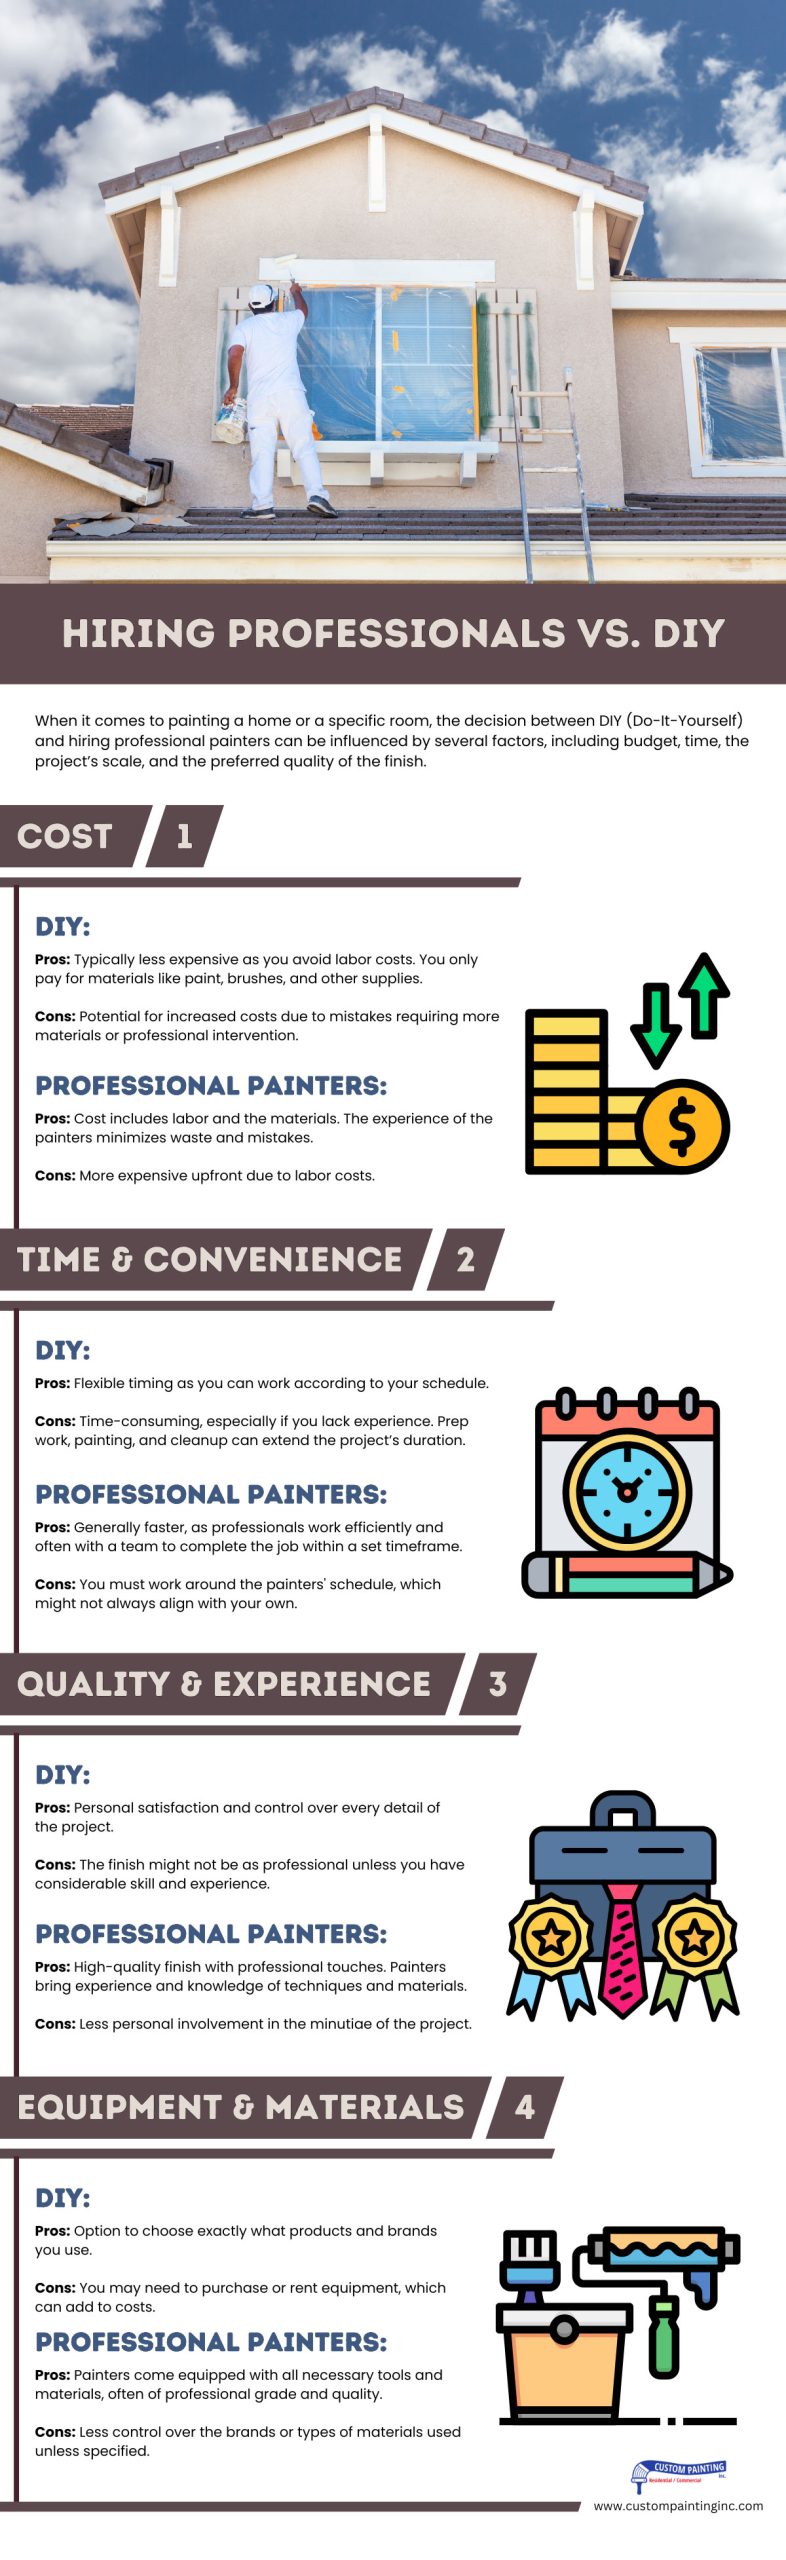
When it comes to painting a Lafayette home or a specific room, the decision between DIY (Do-It-Yourself) and hiring professional painters can be influenced by several factors, including budget, time, the project’s scale, and the preferred quality of the finish.
1. Cost
DIY:
- Pros: Typically less expensive as you avoid labor costs. You only pay for materials like paint, brushes, and other supplies.
- Cons: Potential for increased costs due to mistakes requiring more materials or professional intervention.
Professional painters:
- Pros: Cost includes labor and often the materials. The experience of the painters minimizes waste and mistakes.
- Cons: More expensive upfront due to labor costs.
2. Time and convenience
DIY:
- Pros: Flexible timing as you can work according to your schedule.
- Cons: Time-consuming, especially if you lack experience. Prep work, painting, and cleanup can extend the project’s duration.
Professional painters:
- Pros: Generally faster, as professionals work efficiently and often with a team to complete the job within a set timeframe.
- Cons: You must work around the painters’ schedule, which might not always align with your own.
3. Quality and experience
DIY:
- Pros: Personal satisfaction and control over every detail of the project.
- Cons: The finish might not be as professional unless you have considerable skill and experience.
Professional painters:
- Pros: High-quality finish with professional touches. Painters bring experience and knowledge of techniques and materials.
- Cons: Less personal involvement in the minutiae of the project.
4. Equipment and Materials
DIY:
- Pros: Option to choose exactly what products and brands you use.
- Cons: You may need to purchase or rent equipment, which can add to costs.
Professional painters:
- Pros: Painters come equipped with all necessary tools and materials, often of professional grade and quality.
- Cons: Less control over the brands or types of materials used unless specified.
Decision-making guide
Here’s how you can decide which option might be best for you:
- Assess the project scope – Small projects or touch-ups might be manageable on your own. Large-scale projects or high-ceilinged rooms might be better suited for professionals.
- Consider your skill level – Suppose you have experience with painting and the project is not too complex, DIY can be a fulfilling option. If you’re unsure about your ability to achieve a professional look, consider hiring pros.
- Evaluate your budget – If budget constraints are significant, doing it yourself will cut costs. However, consider the potential for mistakes and their impact on the overall cost.
- Time constraints – If you need the job done quickly and efficiently, professional painters are likely your best bet. If you have more flexibility in timing, doing it yourself might be feasible.
- Desired quality – For high-quality, durable results, especially in prominent areas of your home, hiring professionals might be preferable.
Preparing your space
1. Planning and preparation
- Assess the room – Determine how much paint and tools you need based on the room size.
- Choose paint – Opt for environmentally friendly paints with low VOCs (Volatile Organic Compounds) to reduce health and environmental impact for Pleasant Hill area homes.
2. Moving furniture
- Clear the room – Remove small items and decor. Move larger furniture pieces to the center of the room if you can’t move them out.
- Cover furniture – Use drop cloths or plastic sheets to cover the furniture and protect it from paint drips.
3. Wall preparation
- Cleaning walls – Wash the walls with a mild detergent solution to remove dust, dirt, and oily spots. It ensures better adhesion of paint.
- Repairing Defects – Fill holes or cracks with spackle, and sand smooth once dry.
4. Taping and covering
- Masking – Use painter’s tape along edges, trim, and areas where the ceiling meets the walls or where different colors meet. Press down firmly to seal.
- Protect floors – Cover floors with canvas drop cloths or rosin paper to protect them from spills and drips.
5. Safety measures
- Ventilation – Keep the area well-ventilated to minimize inhalation of fumes. Open windows and use fans.
- Wear protective gear – Use gloves, masks, and safety glasses to protect against chemicals and dust.
6. Environmental considerations
- Proper disposal – Follow local regulations for disposing of paint cans and cleaning materials like turpentine or thinner.
- Recycling and Reuse – Consider recycling old paint cans and reusing leftover paint for touch-ups or small projects.
7. Final steps
- Double-check – Ensure all surfaces are dry and the room is dust-free before starting to paint.
- Sequential steps – Paint the ceiling first, then the walls, and finish with the trim to prevent drips on freshly painted surfaces.
Application techniques and tips
General best practices
- Surface preparation: Properly clean, sand, and prime the surface to ensure the best adhesion and a smooth finish. Remove all dust, grease, and any loose paint.
- Quality materials: Invest in high-quality paint and tools. Often, higher-quality paints offer better coverage and durability.
- Taping: Use painter’s tape to protect edges and create clean lines, especially around windows, doors, and trim.
Brushes
- Type: Use natural-bristle brushes for oil-based paints and synthetic brushes for water-based paints.
- Technique: Dip only the bottom third of the brush into the paint, tap off excess paint (don’t wipe), and apply with gentle, even strokes. Avoid overloading the brush.
- Application: For trim and detailed areas, use angled brushes for better control and straight lines.
Rollers
- Roller nap: Choose the right nap thickness based on the texture of the surface. Use a thinner nap for smooth surfaces and a thicker nap for textured surfaces.
- Technique: Roll in a ‘W’ or ‘M’ pattern for even coverage, avoiding excessive pressure, which can lead to uneven application.
- Edges: Use a small brush to cut in the edges before using the roller to cover larger areas.
Sprayers
- Settings: Adjust the sprayer for the type of paint and surface. Practice using cardboard or scrap material to get the correct settings and technique.
- Technique: Keep the sprayer at a consistent distance from the surface (usually 6-12 inches) and move with smooth, even strokes.
- Protection: Cover all nearby areas to protect from overspray, and use a mask and goggles for personal safety.
Finishing touches
- Multiple coats: Apply multiple thin coats rather than one thick coat, allowing adequate drying time between coats.
- Sanding between coats: For an ultra-smooth finish, lightly sand between coats with fine-grit sandpaper.
- Cleaning tools: Clean brushes, rollers, and sprayer parts immediately after use to keep them in good condition for future projects.
Addressing common painting challenges

1. Uneven Coverage
- Use high-quality paint – Invest in good-quality paint to achieve consistent coverage and color.
- Proper preparation – Ensure the surface is clean, dry, and smooth before painting. Patch any holes or imperfections.
- Primer – Use a primer before painting if you paint over a darker color or patchy walls.
- Multiple coats – Apply multiple thin coats instead of one thick coat. Let the paint dry thoroughly between each coat.
2. Drips
- Correct tool use – Use the right size and type of brush or roller. Brushes are great for small areas and corners, while rollers cover large, flat surfaces more evenly.
- Avoid overloading – Don’t overload the brush or roller with paint, which can lead to drips.
- Paint consistency – If the paint seems too thick, thin it slightly with water (for latex paint) or mineral spirits (for oil-based paint) according to the manufacturer’s instructions.
- Regular checking – Check and smooth out drips as frequently as needed before the paint dries.
3. Color Mismatch
- Sample test – Before committing to a color, buy a small sample to test on your wall and observe how it looks at different times of the day under various lighting conditions.
- Batch consistency – If you need more than one can of paint, ensure they are all from the same batch. If not, mix the cans in a large bucket to ensure color uniformity.
- Professional advice – Consult with Vallejo paint store professionals who can provide guidance based on your specific conditions and preferences.
4. Textured Surfaces
- Special rollers – Use rollers designed for textured surfaces, such as those with thicker naps, to ensure the paint gets into all the crevices.
- Stippling – For highly textured surfaces, use a stippling technique with a brush to push the paint into uneven areas.
- Multiple angles – Apply paint from different directions to cover all sides of the texture.
5. High Ceilings
- Extension poles – Attach your roller or paintbrush to an extension pole to reach higher areas without a ladder.
- Scaffolding – For very high areas, consider renting scaffolding to provide a stable platform for extended painting.
- Adequate lighting – Ensure good lighting when painting high areas to spot any missed spots or drips.
Aftercare and maintenance
- Regular cleaning – Regularly wash painted surfaces regularly with mild soap and water to remove dirt and grime. Avoid abrasive cleaners or harsh chemicals.
- Immediate spot cleaning – Address spills or stains immediately to prevent them from setting in. Use a soft cloth or sponge to gently blot and clean the affected area.
- Touch-ups – Keep some of the original paint for touch-ups. Apply it with a small brush to cover any chips or scratches. Make sure the area is clean and dry before touching up.
- Avoid direct sunlight – If possible, minimize the painted surfaces’ exposure to direct sunlight, as UV rays can fade colors over time.
- Protective coatings – Consider applying a clear coat or sealant to provide an extra layer of protection, especially for exterior paint jobs.
- Regular inspections – Check regularly for any signs of peeling or cracking. Early detection can help you manage minor issues before they become serious problems.
Conclusion
A Walnut Creek home painting project transformative power lies in the change of color and the meticulous approach to planning and execution. These steps above ensure the outcome is visually pleasing and enduring, maximizing the project’s benefits.
Take charge of your painting project for a stunning finish! Plan meticulously, choose quality materials, and don’t hesitate to seek guidance when needed. Your proactive approach ensures a masterpiece awaits at the end of your brushstrokes.
You might want to consider the long-term benefits of hiring a professional painting contractor in Concord, CA. Call Custom Painting, Inc. at 925-686-0903 or complete our contact form. We will help you turn your vision into a striking reality!
